Monday, November 26, 2018

Yarnosaur


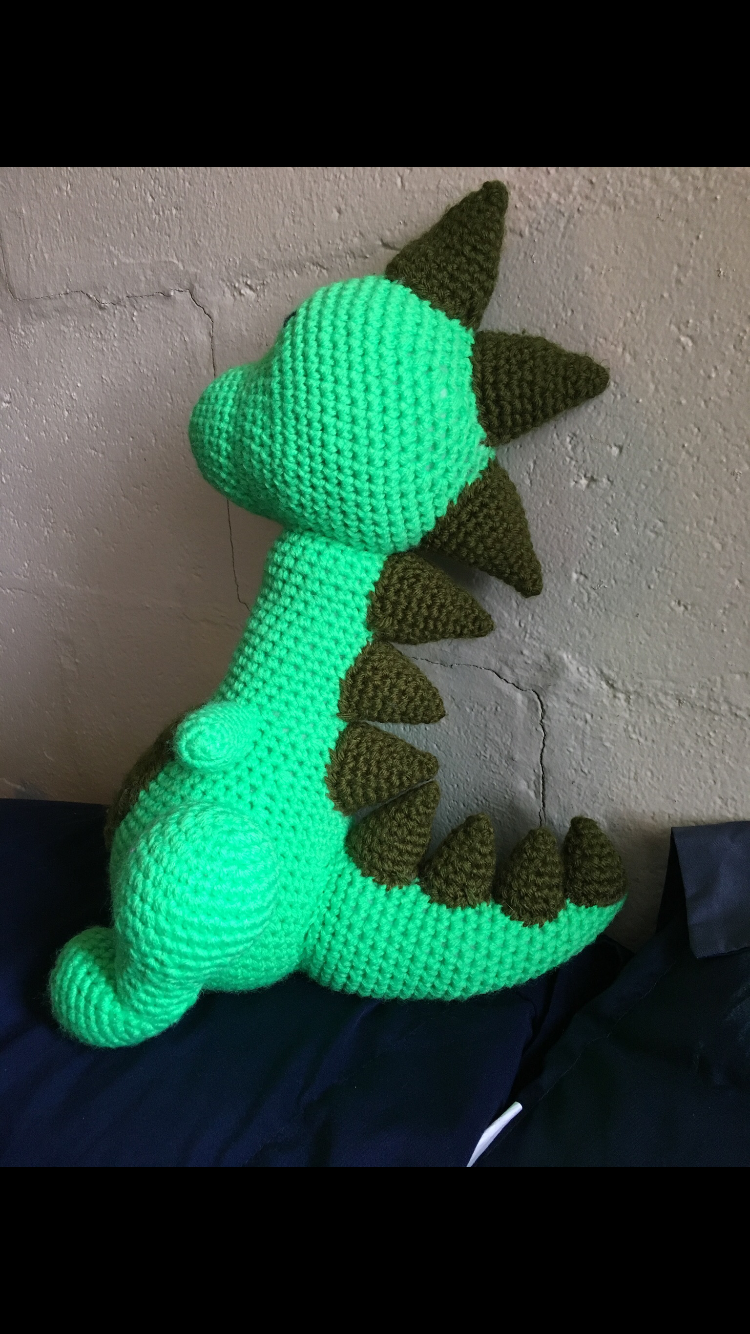
The final project I will be sharing is a crocheted dinosaur that I have named "Yarnosaur." I had a lot of fun making this project. I made it for my boyfriend for Christmas last year, and he loves it a lot. I found the pattern for it on Pinterest, like the rest of my crocheted creations.

The first thing I had to do was go to the store and buy some yarn! I already had the light green yarn at my house, but I did not have any dark green yarn. After my trip to the yarn store, I had to dig out my basket of crochet needles and locate the one that was the correct size for the project. The pattern should always tell you what size hook you should be using for any particular project.

After all of that, it was finally time to start crocheting! The first thing I crocheted was the body, which was the most time-consuming body part to crochet. Next, I crocheted the head. Then, I made the arms, the legs, the spikes, and the belly patch. There are three different kinds of spikes on its back; small, medium, and large. There are three small spikes, four medium spikes, and three large spikes.

After all of the parts were made, I had to sew them all together. I first sewed the head to the body. The hardest thing to sew was the legs. This is because I had to make sure they were even so that the dinosaur could stand up without being uneven and falling over.

My favorite part of the whole thing is his cute little arms. If you try to clap his hands, they just barely touch each other, and I just think it is really cute. The picture at the beginning of this post is my final product: Yarnosaur!

I hope that you enjoyed all of my blog posts. Thank you for reading them all! I hope you craft as much as your heart desires.

Ohio String Art

The next project I am sharing with you in my Ohio String Art. The library at my university hosted a craft night where we all made string art of the state of Ohio. They provided all of the supplies for free, and it was a lot of fun! The supplies they provided were a wooden cut-out of Ohio, a printed picture of a heart, string, a hammer, nails, scissors, and a pencil. 

The first thing we did was cut out the heart and trace it onto the wood wherever we wanted. I placed mine in the lower-middle-right part of the wood. I'm not sure how to describe it exactly. Look at the picture later in this post for reference! 

Next, it was time to start hammering in the nails! We had to be careful not to hammer them into the wood too far so that the nail went completely through it. First, we hammered in the nails on the heart, and then we did the nails around the edges of Ohio. Here is a picture of my project after all of my nails were in.


Next, it was time to add the string! I started with the heart with pink string. I randomly went from nail-to-nail in the heart until I was satisfied with what it looked like. Then, I did black and white string in the area surrounding the heart. I kept going back and forth from the middle to the outside around the heart. 

I also did the border of the wood with string. I switched back and forth between black and white string. This part was very time-consuming, but I think it was worth it!

I am very glad that I got the opportunity to make string art. This was my first time, and I had a lot of fun! Here is a picture of my final product. 


Pom Pom Rug

The next project I am going to share with you is my area rug. The rug is approximately 4x6 feet, and it is made out of yarn. I made this rug over the summer this year for my dorm room, and it is very fluffy. It was cheaper for me to make this rug than it was to buy a fluffy rug from any store. They can be very expensive!

The first thing I did was look up on the internet how to make a pom pom rug. To make a pom pom rug, you start with 2 toilet paper rolls. This is without the toilet paper. You just the cardboard part. You tape the two rolls together so that they touch lengthwise. You are not making a paper towel roll, if that makes sense. Yarn gets wrapped around the rolls 70-90 times for the size pom poms that I made. After that, you cut the yarn, remove it from the toilet paper rolls, and tie the middle together with another short piece of yarn. Make sure to tie it tight to the pom pom doesn’t fall apart! The next step is to use scissors to cut the loops you just created so that they are no longer loops and are just separate strands of relatively the same length. To clear any of these instructions up, you can search a Youtube video on how to make a pom pom rug.

The first thing I did was order a 4x6 foot non-slip rug mat from amazon. After my order came in, I started making the pom poms for the rug. I would make enough pom poms for one row of each color and then tie that row to the mat. I didn’t want to do one thing at once because I didn’t want to get really bored too quickly. I was on a deadline for this project, of course. It was for my college dorm room. Here is a picture of my rug 3 rows into the project. As well as these colors, I also used two shades of blue and some yellow.


I continued my strategy until my rug was finished. I also made the blue and yellow pom poms slightly smaller than the gray, tan, and white pom poms so that they would stick out more. This project took a lot of my time, but I’m glad that I took the time to do it. It is a great edition to the dorm room! Here is a picture of the finished product.


Pizza Planet

I'm not sure how to crop the image in blogger, and it reverted to the original when I tried to crop it in google docs.

The next painting I am going to share with you is my pizza planet painting. This is also one of my favorites. I painted this project 3 years ago in my painting class in high school. I really like this painting because it looks like it’s glowing. The purpose of the entire project was is fact to create a “sign” that looked like it was glowing.

The technique was kind of difficult to learn, so we had to practice before we started painting the real thing. The technique starts with a single white line painted in the middle. Then, you surround the white line with increasingly darker shades of the same color. You do not blend the colors together. Up close it looks kind of odd, but from far away the painting looks like it is glowing! Pretty cool, huh?

The first step was to choose an image. It took me a long time to choose this image. I google searched “signs that glow” among other things, and I finally stumbled upon the pizza planet sign from Toy Story. It’s not the exact logo, but it is similar and the same restaurant name. To transfer the image to a large piece of cardboard, we traced the image onto transparency paper and projected an enlarged image onto the whiteboard in the classroom. We taped the cardboard to the whiteboard and traced the image!

Next, it was time to start painting. This step took a decent amount of time because there were a lot of precise lines that had to be painted. I used the colors red, yellow, and blue because they are the primary colors, and the thought they would look the best when they were “glowing”

At the end of the school year, this painting was a part of my high school’s art show! I was very proud of myself because it was my first painting that had made it in. Now, the painting hangs in my boyfriend’s room, so I don’t see it much, but I am glad that it is somewhere and not just hidden under my bed like the rest of my art!

Octopus Painting


The next project I am going to share with you is a painting of an octopus holding an umbrella. This is another project I made in my Science in Art class in high school. The purpose of this project was to use rubbing alcohol to turn the watercolor paint into dots. As you can see from my picture, the tentacles have the spots made from the rubbing alcohol. The idea of the painting is that the octopus is going deeper into the ocean and it turned the umbrella inside out.

The first thing I did was choose an image. This project was a little bit more difficult to choose an image for because it couldn’t be anything we wanted. It had to be something that we could reasonably use the rubbing alcohol with. We couldn’t just draw a person and put random spots everywhere. I chose an octopus because of the tentacles, and I chose to make it holding an umbrella to add interest to a regular old octopus painting.

As with all of our paintings, the next step is to draw the image. I had a limited amount of time to complete this project, so I drew this picture relatively quickly. Obviously, there are no reference pictures on the internet of a real octopus holding an umbrella, so I had to use my imagination a little bit. Next, here come my favorite part: the actual painting! First, I painted the octopus. I used the color yellow because yellow is my favorite color. I also mixed the yellow with a little bit of brown to add dimension to my octopus. To paint the umbrella, I painted most of it a regular red and then used a darker red where the folds in the umbrella would be.

The trick with the rubbing alcohol was that you had to put it on while the watercolor paint was still wet. To get my spots accurate, I dipped my paintbrush in the rubbing alcohol and then touched it to the paper. I think the spots turned out pretty cool! Science!

My least favorite part of this painting is the background. I just really did not blend it very well. Overall, I do like this painting a lot! Obviously I like it enough to put it on my blog!

Mouth Painting

This next project is one of my favorites. It is a painting of an open mouth. I made this painting 3 years ago in a painting class I took in high school. As always, the first step was to choose an image. It had to be an image that we could blend, so it had a little more added difficulty for beginners like me. I don’t know what made me decide to pick an open mouth as my image, but that’s just kind of how it worked out.

After choosing an image, the next step was to draw it onto a piece of paper. This took me a couple days. I am always too much of a perfectionist when it comes to all of my projects. The tongue and the teeth were the most difficult parts for me to draw. I even restarted the entire drawing a couple of times.

Once my drawing was to my liking, it was time to start painting! The first thing I painted was the lips. I started by painting the lightest color, and then I layered darker colors on top of it. Looking at it now, I think my darkest color was a little bit too dark, but it didn’t bother me three years ago! The next thing I painted was the gums. The gums are my favorite part of the entire painting. I don’t really even remember how I got them to look like that. I just remember layering the different shades of pink and white. After the gums, I painted the teeth with different shades of gray and white. My second favorite part of the painting is the roof of the mouth. I think I did some good blending. My least favorite part is the tongue. I just don’t really think it looks like a tongue at all. Overall though, I do enjoy this painting a lot. I even hung it on my bedroom wall for a short period of time!

I painted the background yellow because yellow is my favorite color. My art teacher told me that my painting looks like an emoji opening its mouth! I honestly had a lot of fun painting this in my art class. It was my first painting class, and I don’t think I did bad for someone who had never painted before! This project was my favorite out of the whole class.


Chevron Blanket


The next project I will be sharing is the chevron blanket I made for my mother for Christmas last year. It was originally a gift for one of my friends, but then we lost touch with each other, so I decided to give it to my mom for Christmas instead! I also found this crochet pattern on Pinterest. I made this blanket over the course of 3 months, working on it every once and awhile. The colors I used were gray, pink, and white. Those were the original colors I chose for my friend, but it still worked out that my mom likes those colors too.

The pattern for this blanket repeated around every 20 stitches or so, so I got very bored very quickly. This is probably part of the reason why it took so long for me to finish this project. As you can see from the picture, the stripes of the blanket alternate between two different thicknesses. The skinnier stripe is 4 rows long, and the thicker stripe is 6 rows long. The pattern alternates between color as well as thickness. I like how it is a chevron pattern and not just plain stripes. I think it gives the blanket a more modern look.

My mom was really excited to receive this blanket as a gift. It is actually very warm despite being relatively thin. It sits on our couch at home, and she uses it all the time while watching TV. I feel bad that I never gave the blanket to my friend, but I think it is better this way. My mom is happy she has a warm blanket made for her by her daughter, and I’m happy that I get to use it too!

This pattern is also fairly easy to locate on Pinterest by searching “crochet chevron blanket pattern.” It might require some scrolling, but I hope you can find it! Feel free to comment on my page if you have any trouble or with any other questions or comments!